TL;DR: Cloudflare Pages + the open-source edgetunnel project, plus a free domain, gets you a long-term free VLESS node with no server required and built-in global CDN IP optimization. The original author hit 921.95 Mbps on a gigabit connection in real testing, with 8K video playing instantly. The whole process takes about 10 minutes and costs exactly $0.
It all started when I stumbled across a video from 零度解说: “2026 Ultimate Cloudflare Free VPN Self-Build! Unlimited Revival, Permanently Available | Global High-Speed Nodes | Instant 4K/8K”, 14 minutes and 24 seconds long. Tutorial videos like this are actually packed with information density—every step maps to a specific page—but video as a medium isn’t searchable or skimmable, and following along in real time is a juggling act.
So I ran it through my video2script pipeline: 159 page slices, 81,402 characters of OCR, 193 narration segments transcribed, with pages and narration aligned segment by segment. The tutorial below was reconstructed from those decomposition artifacts. Every sentence from the original video is mapped to a concrete step, all spoken language translated into executable instructions, plus the pitfalls the video glossed over filled in.
Here’s the bird’s-eye view—six steps for the entire workflow:
| Step | Where | Output |
|---|---|---|
| 1. Register a free domain | DNSHE | A free domain valid for 10 years |
| 2. Register on Cloudflare | cloudflare.com | Free account |
| 3. Delegate domain to CF | CF Dashboard | NS records replaced, domain protected by CF |
| 4. Create KV + deploy Pages | CF Workers & Pages | edgetunnel backend |
| 5. Bind custom domain | CF Pages + DNS | Independent access endpoint |
| 6. Get subscription, import into client | /admin panel + v2rayN | Working nodes |
Step 1: Register a Free Domain on DNSHE
Open DNSHE (the original author’s blog post has the entry link) and register a free account. The registration flow is the standard email verification code routine, with only three things worth noting:
- One free account can register up to 5 free domains;
- When selecting a root domain, four are available, but only the first and third can be registered completely free—the second and fourth require invitation codes;
- After registration, the domain is valid for 3653 days (about 10 years), and the system opens a free renewal channel within 180 days before expiration.
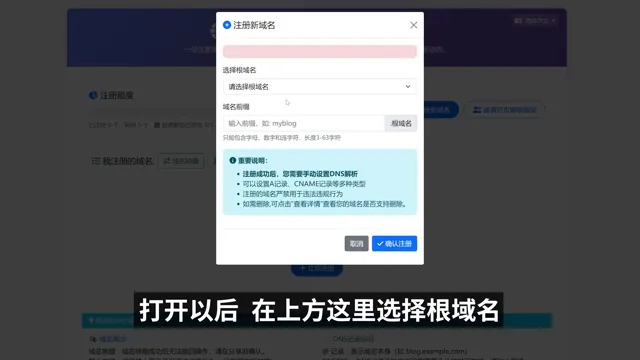
After picking a root domain, enter your prefix. Here’s a demonstration using the original author’s actual workflow: he entered lingdu, and the system showed lingdu.ccmwu.cc was already taken—totally normal, since good free domain names get snapped up fast—so he switched to the longer lingdujieshuo and it went through. Pitfall: make your prefix longer and more unique for a higher first-try success rate.
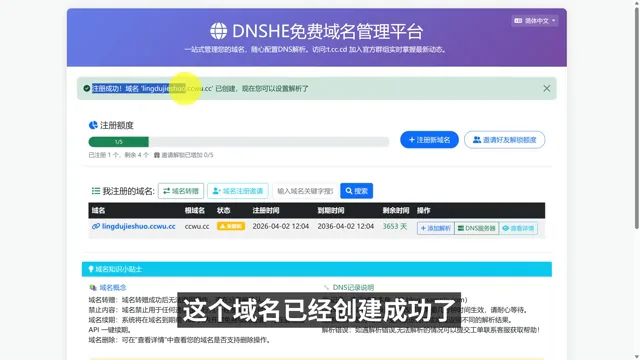
After successful registration, the dashboard shows “4 remaining” quota and the domain status. This domain is yours for the next 10 years.
Step 2: Register a Cloudflare Account and Delegate Your Domain
Head to cloudflare.com to register a free account—you can sign in with Google/Apple/GitHub, or register directly with email. After logging in, go to the dashboard, find the Domains entry, select “Add Domain,” and paste in the free domain you just registered.
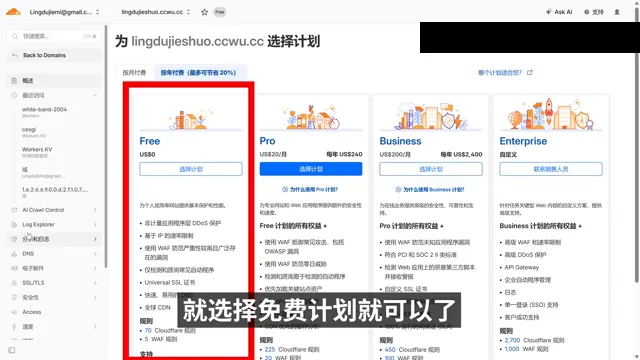
Pitfall: select the Free plan (US$0/mo)—that’s all you need. The Pro plan at $20/month provides zero benefit for this setup—Pages, KV, and CDN all fall within the free tier.
After adding the domain, Cloudflare assigns you two NS server addresses, formatted like gait.ns.cloudflare.com. Copy the first one, go back to DNSHE’s domain management page, and find the “DNS Servers (Domain Delegation)” setting:
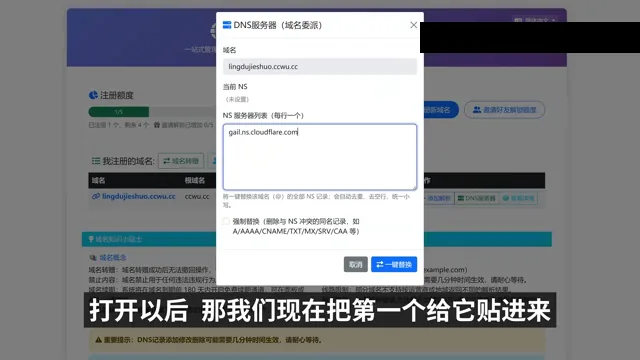
Paste both NS servers in, one per line, and click “One-Click Replace.” Pitfall: you must enter both NS records—filling in only one will result in incomplete resolution.
Back in the Cloudflare dashboard, click “Check Nameservers,” then refresh the page and wait for the status to change. The video showed it taking effect in about 1 minute, though the official documentation says 1–2 hours—if you’ve been waiting 10 minutes and it hasn’t turned green, you haven’t done anything wrong; it’s just DNS propagation. Go do something else and come back. When the status reads “Your domain is now protected by Cloudflare,” the delegation is complete.
Step 3: Create a KV Namespace
In the Cloudflare dashboard’s left sidebar, expand “Storage & Databases” and find Workers KV:
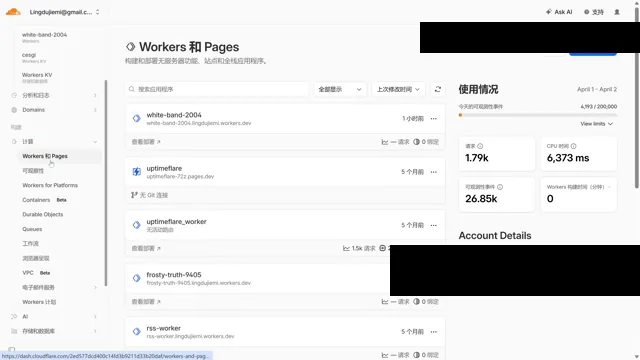
Click “Create KV Namespace”—the name is customizable. The video uses cfoo, but you can use whatever you like. Just remember the name, because you’ll need it for the binding step later.
Step 4: Deploy edgetunnel to Pages
First, download the edgetunnel open-source project’s zip package (the video description has the link; searching for edgetunnel on GitHub works too—the author packaged it as edgetunnel-main.zip, about 428 KB).
Then back to the Cloudflare dashboard: left sidebar → “Compute” → Workers & Pages → Create Application. Pitfall: there are two options here—the first creates a Worker, the second creates a Pages project. Choose the second one. After selecting Pages, choose “Drag and Drop Files” to start:
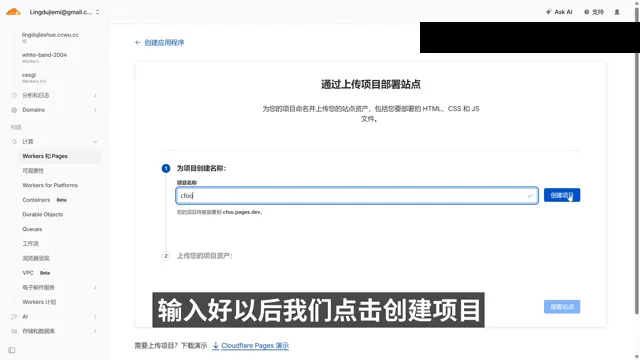
The project name is customizable (the video again uses cfoo). Drag the zip into the upload area and click “Deploy.” A few seconds later, it displays “Your project has been deployed to xxx.pages.dev.”
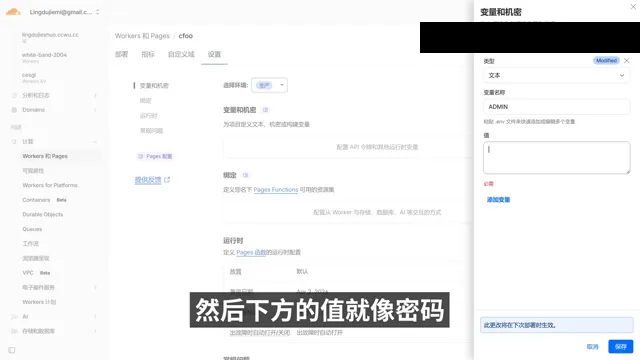
Next are three critical configurations, all done in the project’s “Settings” page:
1. Add an environment variable. “Variables and Secrets” → Add. The variable name must be uppercase ADMIN, and the value is your management password. The video demo fills in 12345678—when you set up your own, make sure to use a strong password. This password is the only lock on the /admin backend. Click Save when done.
2. Bind the KV namespace. “Bindings” → Add → Select KV Namespace. The variable name should be KV (not a single character off, as shown in the video), and the value should be the namespace you created in Step 3. Save.
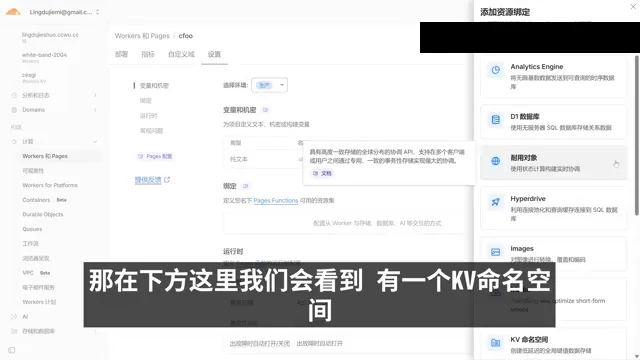
3. Bind a custom domain. “Custom Domains” → Set Custom Domain, and enter your free domain (e.g., lingdujieshuo.ccu.cc). At this point, CF will prompt you to add a CNAME record and provide the target value.
Go to the domain’s DNS records page (Dashboard → Your Domain → DNS → Records) and add a record: type CNAME, name as per the prefix indicated by Pages, target as per the indicated value, then save:
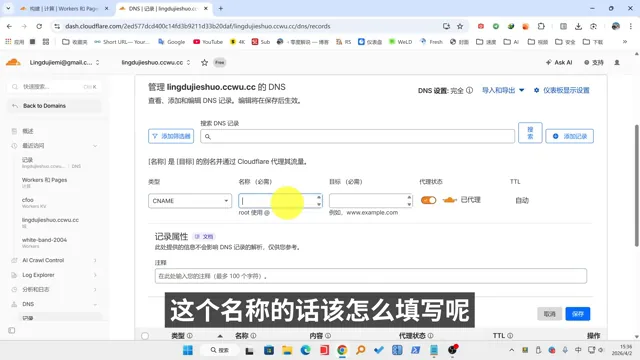
Pitfall: the video specifically demonstrates an operational detail—right-click the CNAME prompt link on the “Add Custom Domain” page, select “Open in New Tab,” then go to the DNS page to add the record. This way, the custom domain page stays open. Otherwise, switching back and forth can cause you to lose state.
After adding the record, go back to Pages and re-upload the zip (“Create Deployment”), then click “Save and Deploy.” Wait for the status to turn green and the custom domain to show as activated—basic deployment is now complete.
Step 5: Access the /admin Backend to Get Your Subscription Link
Visit your site using the free domain and append /admin to enter the management backend. Log in with the ADMIN password you set in Step 4. You’ll see the edgetunnel settings page:
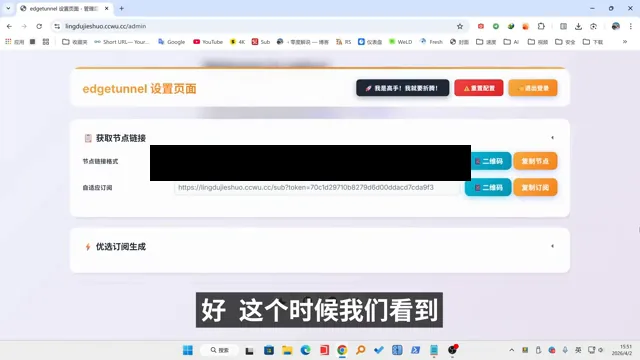
The page directly provides node links and subscription addresses, formatted like:
| |
There are two choices to make at this step:
Optimized subscription mode. The default is “Random,” with a default optimized count of 16—the video recommends changing it to 50 or 100 directly, so you import more candidate IPs at once and the client auto-selects the fastest after speed testing. Click Save after changing.
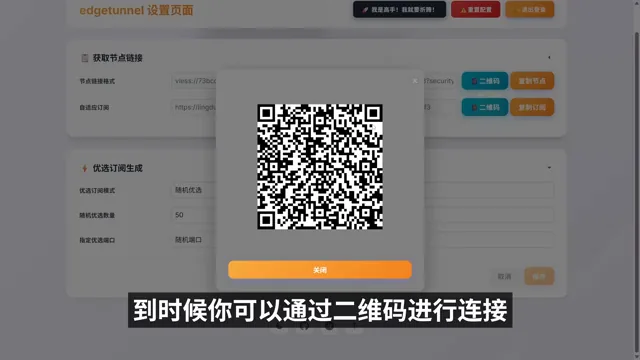
Subscription vs. single node. The page offers both “Self-Selected Subscription” and “Custom Node” options: copying a subscription address into the client means future server-side node updates require no action on your end; a single node link is handy for emergencies. The subscription address is recommended.
Step 6: Import into v2rayN and Test
Download the open-source client v2rayN (the video description has the link; it’s open-source on GitHub). “Subscription Groups” → Add Subscription → paste the subscription address into the URL field, then “Update All Subscription Groups”—50 nodes will be imported automatically.
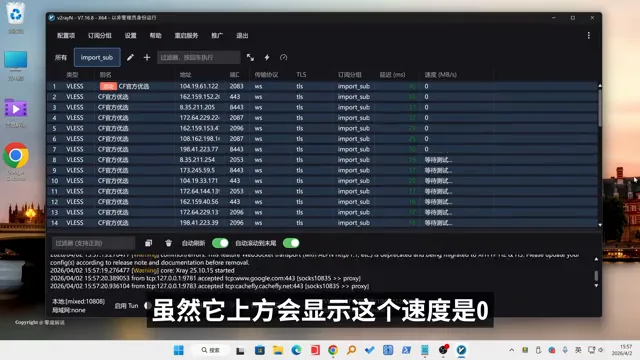
Pitfall: the speed test column displayed above the node list will show all zeros—ignore it. This is a display issue with v2rayN for VLESS over WebSocket nodes and does not mean the nodes are unusable. The correct verification method:
- Select all nodes → Test Latency. Normal values should be in the 40–200ms range (the video showed 40–20ms);
- Set the lowest-latency node as the active server, and switch the proxy mode to “System Proxy”;
- Open myip.com and refresh—if the IP changes to a Cloudflare address range, you’re connected.
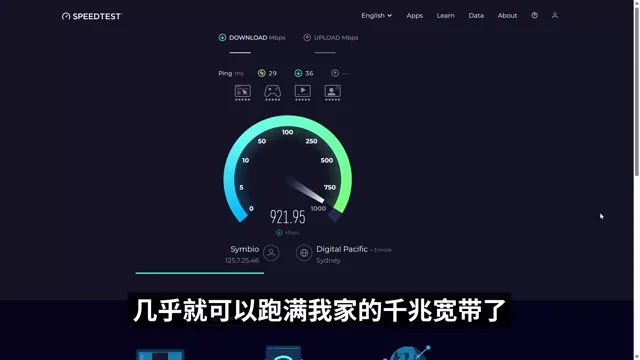
The original author’s real-world results: Speedtest download of 921.95 Mbps, essentially maxing out a gigabit connection; YouTube 8K (Stats for Nerds showing ~240,000 Kbps) playing smoothly; ChatGPT and Gemini both registering and logging in without issues.
Advanced: PROXYIP and Custom Optimization
At the top of the /admin backend, there’s an “I’m a Pro! I want to tinker!” entry. Expanding it reveals the Cloudflare CDN access settings:
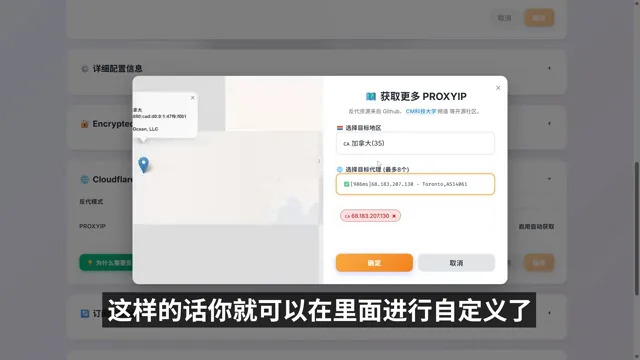
Here you can turn off “Auto-fetch” and manually specify a PROXYIP—for example, selecting a Singapore (ProxyIP.SG.CM...) or Canada reverse proxy address. PROXYIP adds another exit proxy layer behind the Cloudflare CDN. In regions where direct CF connections are rate-limited or heavily blocked, swapping in the right PROXYIP can deliver a dramatic speed boost. Sources are fetched by default from the CMliussss open-source project on GitHub—just pick by country/region.
For beginners, it’s recommended to leave “Auto-fetch” as-is. The original video puts it plainly: “If you’re not the type who likes to tinker, just leave it on auto.”
The Boundaries of This Setup, Stated Clearly
The advantages are straightforward: zero cost, no server, global CDN, a 10-year free domain, and when an IP gets blocked it’s the IP, not the domain, that’s affected (swap to an optimized IP to “revive”).
But three limitations must be understood:
- DNSHE is a third-party free domain service, not a registry. If it goes under, your domain goes with it. For stability, swap the domain for a proper one purchased on Namecheap or Cloudflare Registrar—all other steps remain identical;
- Cloudflare’s free tier has limits: Pages gets ~100K daily requests, KV gets ~100K daily reads—more than enough for personal use, but running a public proxy service will get your account banned;
- “Permanently available” presupposes the protocol’s fingerprint hasn’t been targeted. VLESS + WebSocket + TLS is currently usable in most network environments, but like any self-built solution, there’s a possibility of being specifically identified and blocked.
About This Decomposition Itself
The raw material for this tutorial was a 14-minute-24-second video. The decomposition output totaled 159 page slices, 81,402 characters of OCR text, and 193 narration segments with timestamps. During writing, I cross-referenced all three artifacts: the narration conveys “operational intent,” the OCR captures “page facts,” and frame screenshots serve as “visual evidence”—for instance, the ADMIN variable name must be uppercase, the KV binding name must be KV, and choosing Pages over Worker: these three most error-prone points are barely mentioned in passing during the narration. It was only through repeatedly spotting them in the OCR text that I confirmed them as hard rules.
Video transcription used paraformer-realtime-v2, OCR used qwen-vl-plus in verbatim mode, and page slicing used pHash scene clustering. As always for the whole pipeline: it’s only a tutorial if you can reproduce it.